
Almost everyone who has ever deployed something hits this exact wall.
You rent a VPS from one provider, maybe Hetzner, DigitalOcean, Contabo, or a Namecheap VPS. It gives you a public IP address, a string like 203.0.113.45. Separately, you bought a domain name from somewhere else entirely, maybe GoDaddy, Namecheap, or Cloudflare, because that is where it was cheapest or where you already had an account. So now you have two things bought from two different companies that have no relationship with each other: a server with an IP address, and a domain with a name.
And between them sits a gap that nobody explains. The VPS provider assumes you will sort out the domain. The domain registrar assumes you know where you want to point it. Neither walks you through the bit in the middle. You are left with a working server that nobody can reach by name, and a domain that leads nowhere.
This guide closes that gap. First the concept, because the reason people get stuck is almost never the clicking, it is not understanding what the clicks are actually doing. Then the walkthrough, covering both of the main methods, so you know not just how but which one to choose. And finally the part most guides skip entirely: getting HTTPS working, because a site reachable only over plain HTTP in 2026 is a site browsers actively warn people away from.
The Concept: Two Separate Decisions People Wrongly Merge Into One
Here is the single most important idea in this entire guide, and the thing that, once understood, makes everything else obvious.
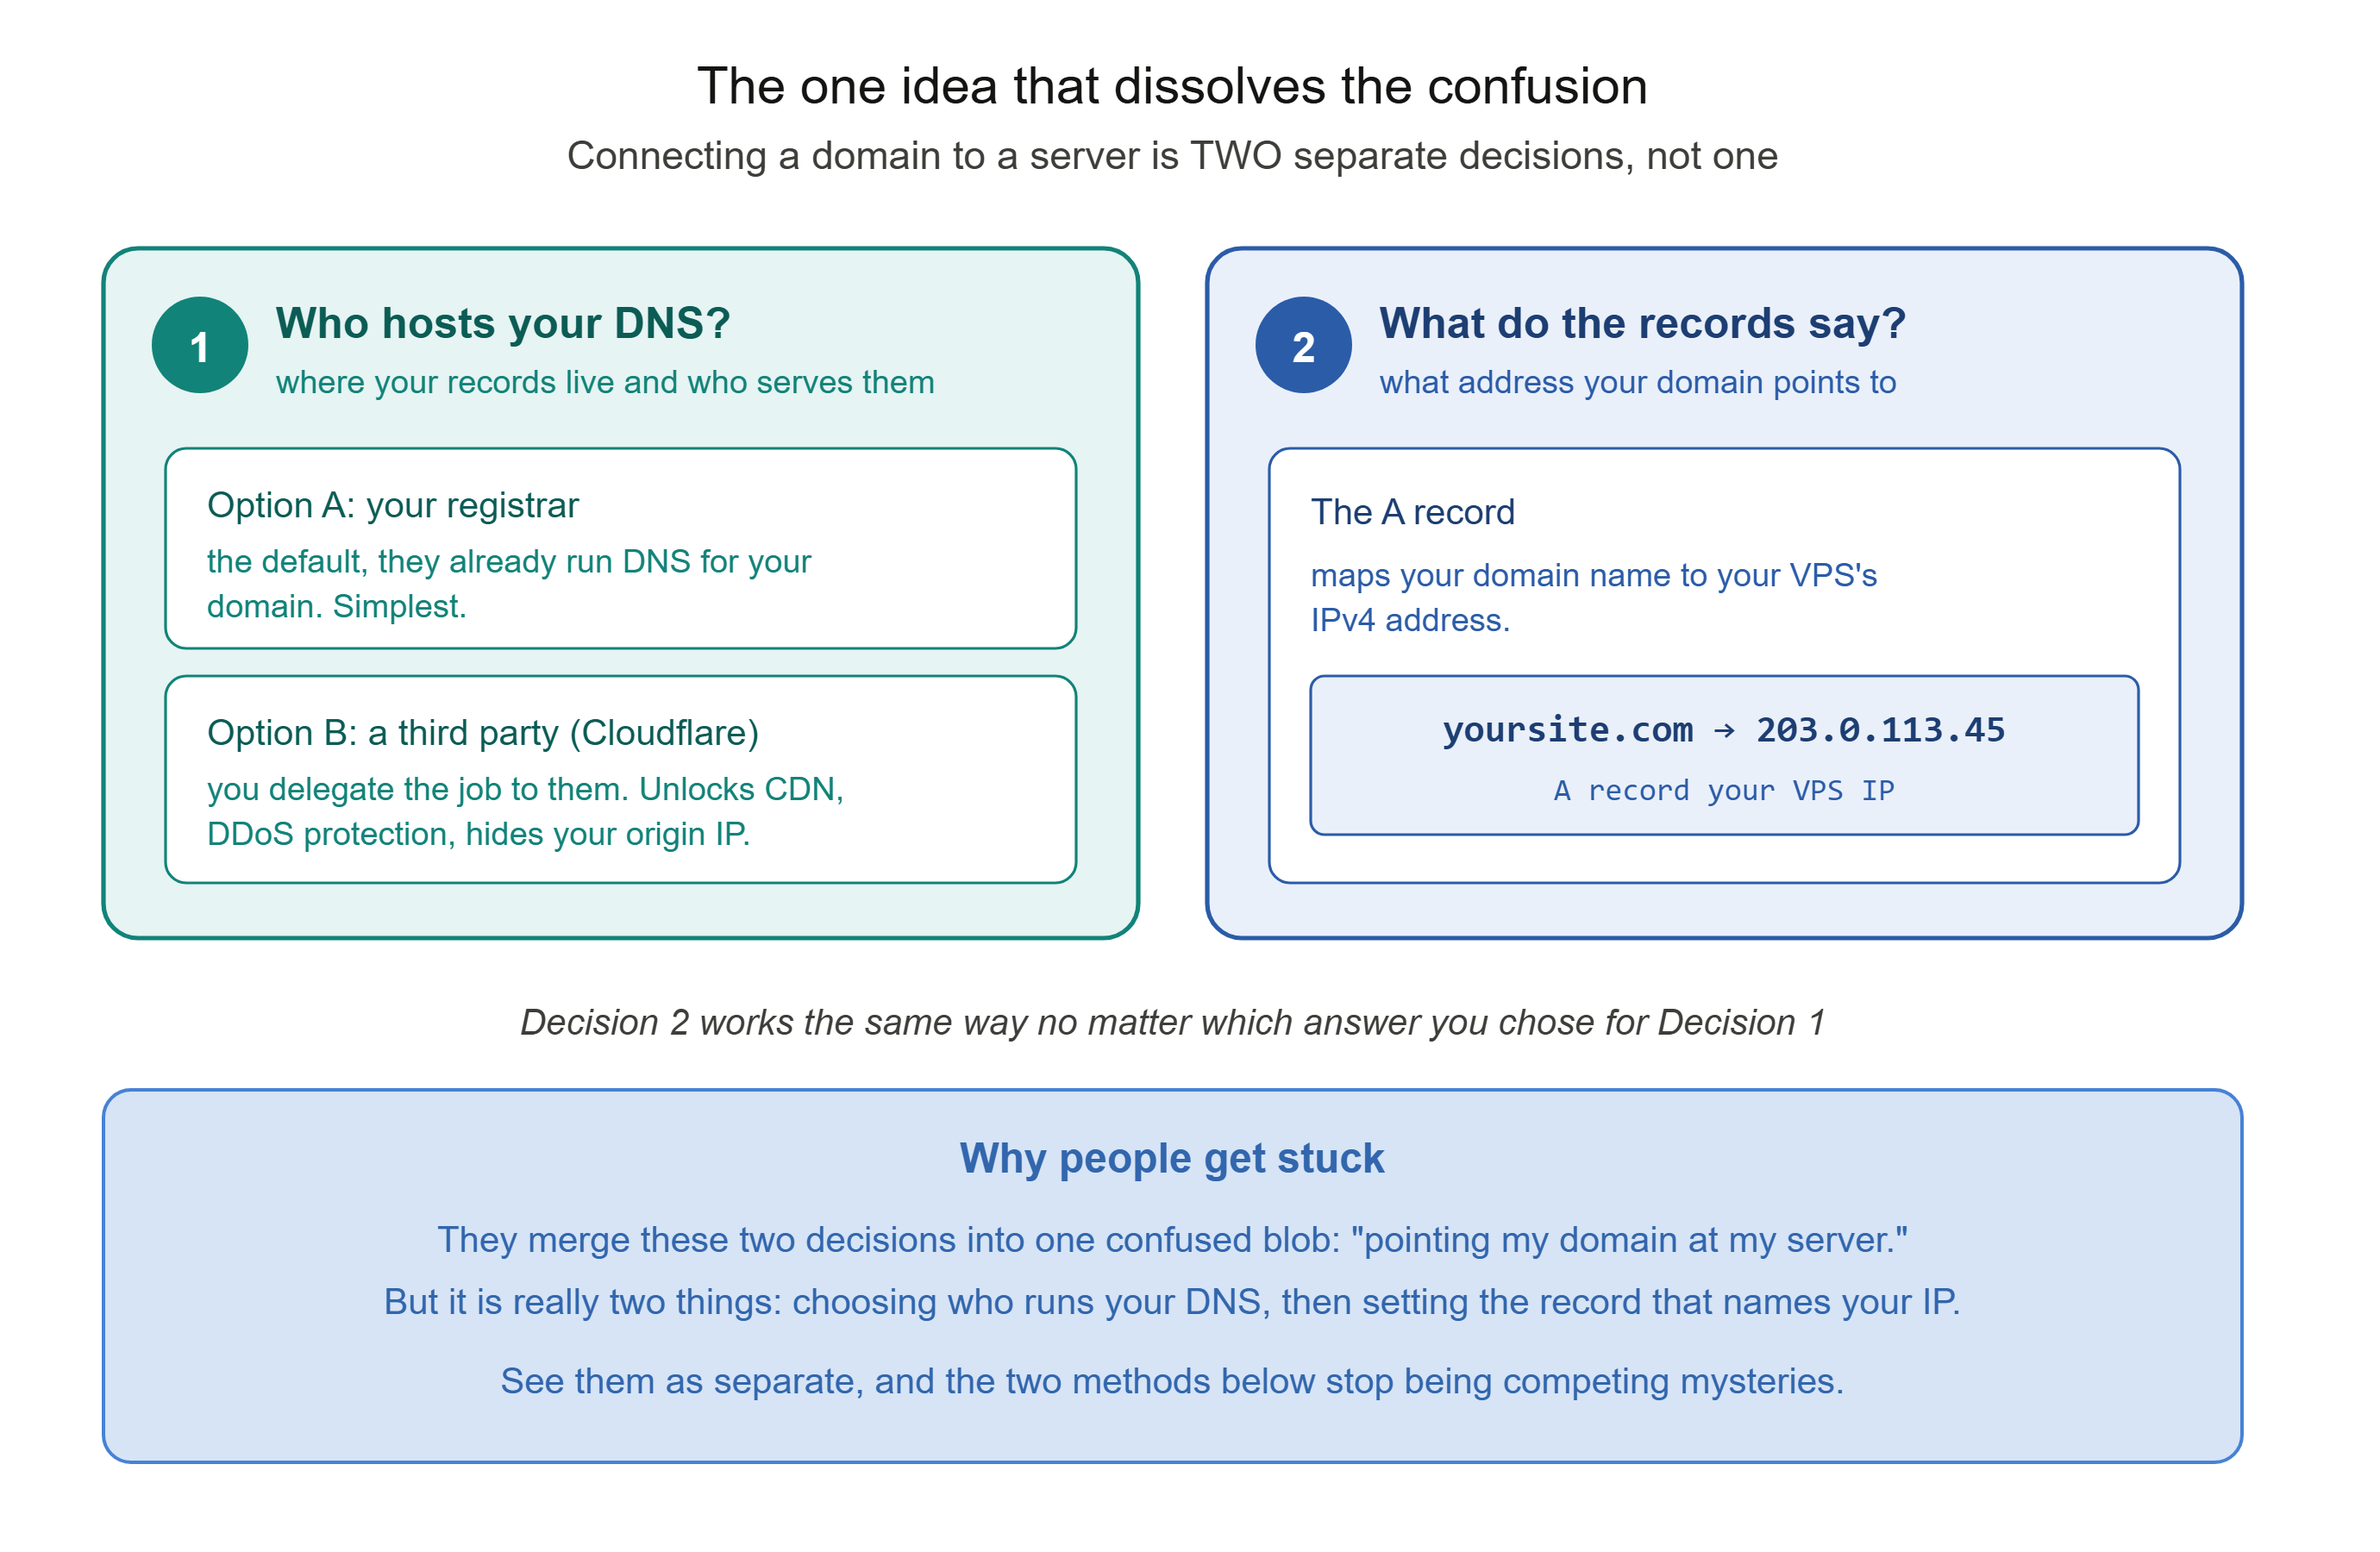
Connecting a domain to a server involves two completely separate decisions, and almost everyone who gets stuck is stuck because they have merged them into one confused blob in their head. Separate them, and the confusion evaporates.
Decision one: who hosts your DNS? Remember from the DNS post (DNS: The Internet's Phone Book, and Its Biggest Weakness) that somewhere out there, a set of authoritative nameservers holds the records for your domain and answers the world's questions about it. The question here is: whose nameservers will those be? You have a choice. It can be your registrar's own nameservers, the default, since they run DNS for every domain they sell. Or it can be a third party like Cloudflare, whom you delegate the job to. This decision is about where your domain's DNS records live and who serves them.
Decision two: what do those records say? Wherever your DNS is hosted, it holds records. The one that matters here is the A record, which maps your domain name to an IPv4 address. This decision is about what address your domain actually points to, namely, your VPS's IP.
People get stuck because they conflate these. They think "pointing my domain at my server" is one action, when it is really two: choosing who runs your DNS, and then setting the record that names your server's IP. Once you see them as separate, the two methods below stop being competing mysteries and become simply two answers to decision one, with decision two working the same way in both.
Hold one more idea from the DNS post in mind as we go: propagation. DNS answers are cached all over the world according to their TTL, so when you change where your domain points, the change is not instant. It rolls out as old cached records expire. This is why nothing in this guide takes effect the very second you click save, and why patience is part of the process, not a sign something is broken.
Method One: Keep Your Registrar's DNS, Just Add an A Record
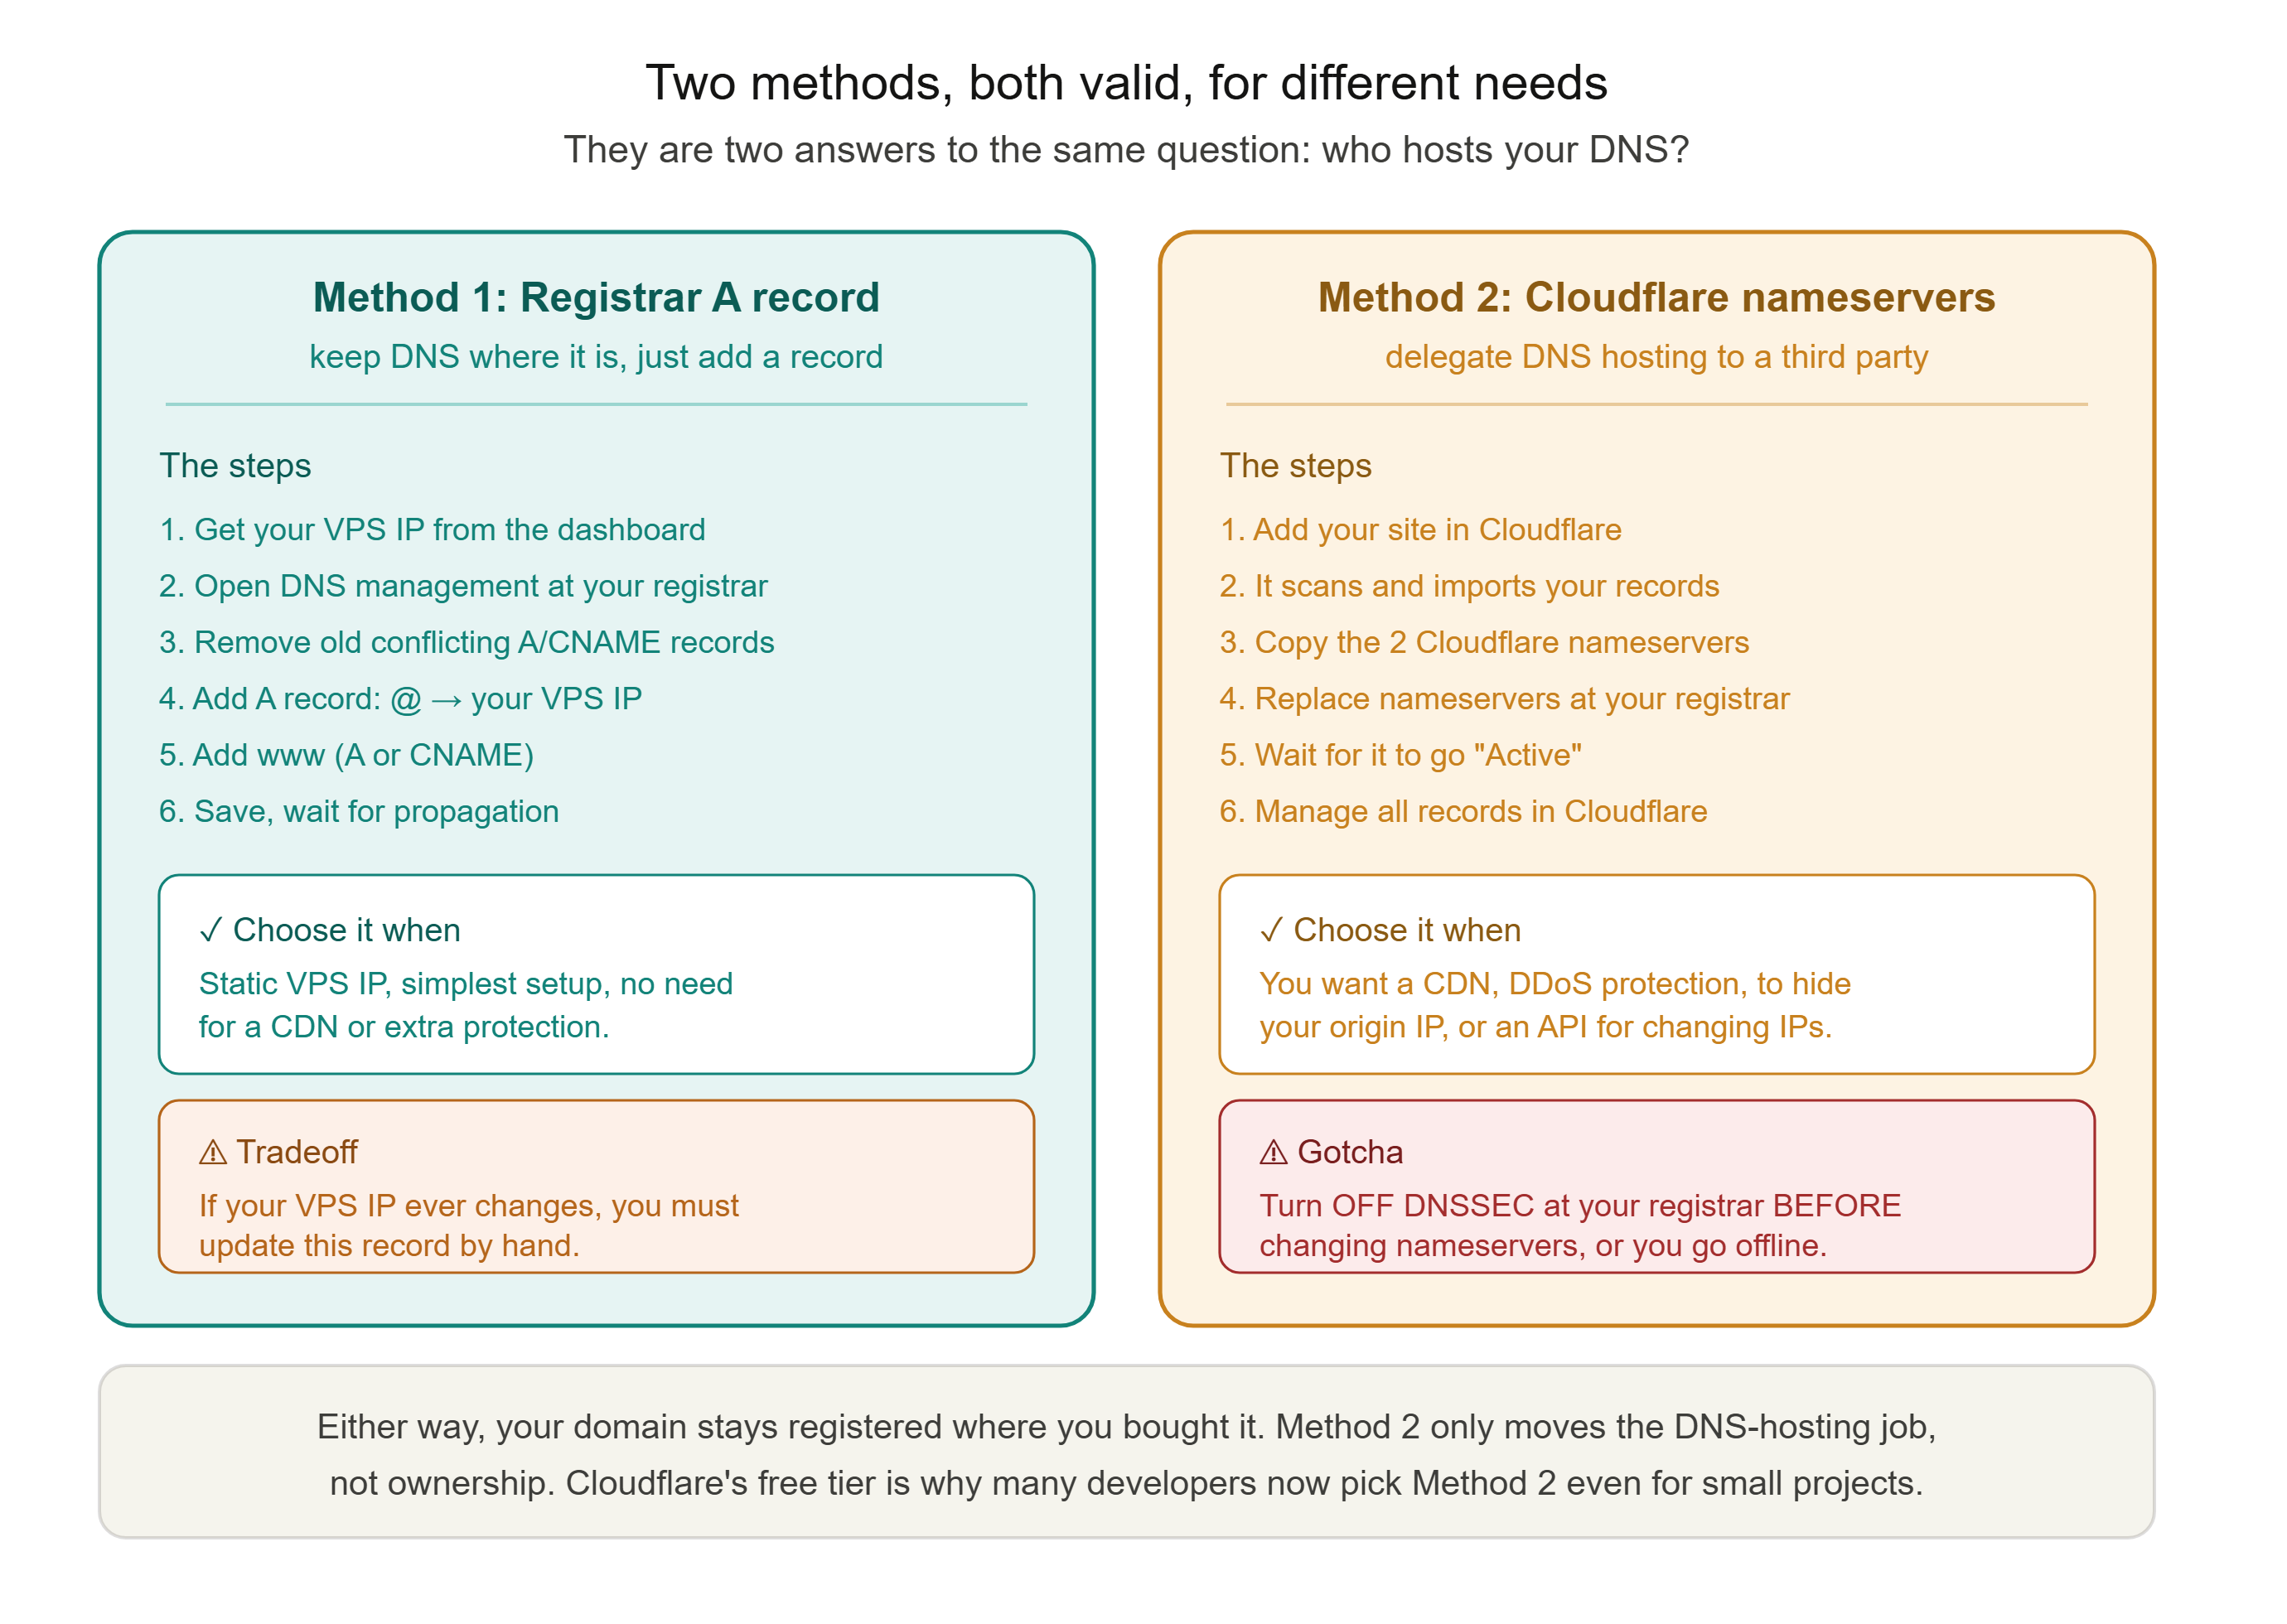
This is the simplest method, and for a great many people it is the right one. You leave your DNS where it already is, at your registrar, and you simply edit one record to point at your VPS.
Here is the whole idea: your registrar is already hosting your domain's DNS by default. You do not need to move anything. You just log in and add or edit the A record so it points at your VPS's IP address.
The steps, in principle, are the same wherever your domain lives, even though every registrar's panel looks slightly different:
- Get your VPS's public IP address from your hosting provider's dashboard. It will look like 203.0.113.45.
- Log in to your domain registrar and open the DNS management page for your domain.
- Find the existing A records. Delete or edit any old A, AAAA, or CNAME records for the root (often shown as
@) and forwww, so they do not conflict with what you are about to add. - Add an A record for the root domain: host
@, value your VPS IP. This makesexample.compoint at your server. - Add a second record for
www. You can make this another A record pointing at the same IP, or a CNAME pointing at your root domain. Either makeswww.example.comwork. - Save, and wait for propagation, up to around 24 hours, though often much faster.
That is it. Your domain now resolves to your server.
When to choose this method: if your VPS has a static IP that will not change, and you do not need extra features like a CDN or DDoS protection, this is the clean, correct choice. There is one honest caveat worth knowing: with the A record method, if your VPS IP ever changes, you must come back and update this record by hand. For a stable server that is a non-issue, but it is the tradeoff to be aware of.
Method Two: Delegate Your DNS to Cloudflare (or Another Provider)
The second method answers decision one differently. Instead of leaving your DNS at your registrar, you hand the job of hosting it to a third party, most commonly Cloudflare, and manage your records there instead.
Why would you do the extra work? Because moving your domain's nameservers to Cloudflare unlocks a set of things the registrar's basic DNS panel simply cannot do: putting your site behind Cloudflare's network for CDN caching and speed, hiding your server's real IP address, DDoS protection, a web application firewall, free SSL termination, easy DNSSEC, and a proper API. For anything you are self-hosting seriously, this is often worth it.
Crucially, and this surprises people, you do not move your domain away from your registrar to do this. Your domain stays registered exactly where it is. The only thing you change at the registrar is which nameservers it points to. Ownership does not move; only the DNS-hosting job does.
The steps:
- Create a Cloudflare account and choose "Add a site" (or "Onboard a domain"), then enter your domain.
- Cloudflare automatically scans your existing DNS records and imports what it finds. Review this list. In particular, make sure there is an A record pointing your domain at your VPS's IP; add or correct it if needed.
- Cloudflare gives you two nameservers to use, something like
ada.ns.cloudflare.comandbob.ns.cloudflare.com. Copy them. - Log in to your registrar, find the nameserver setting for your domain, and replace the registrar's default nameservers with the two from Cloudflare.
- Wait for the delegation to take effect, up to 24 to 48 hours, though usually faster. Cloudflare emails you and shows the domain as "Active" once it sees the change.
- From now on, you manage all your DNS records inside Cloudflare, not at your registrar.
One important gotcha, learned the hard way by many. If your domain currently has DNSSEC enabled at your registrar, you must turn DNSSEC off at the registrar before changing the nameservers. Changing nameservers while DNSSEC is still active can make your domain unreachable, because the old cryptographic signatures no longer match the new DNS host. You can re-enable DNSSEC later, from within Cloudflare, once the domain is active. This single step trips up a lot of people, so do not skip it.
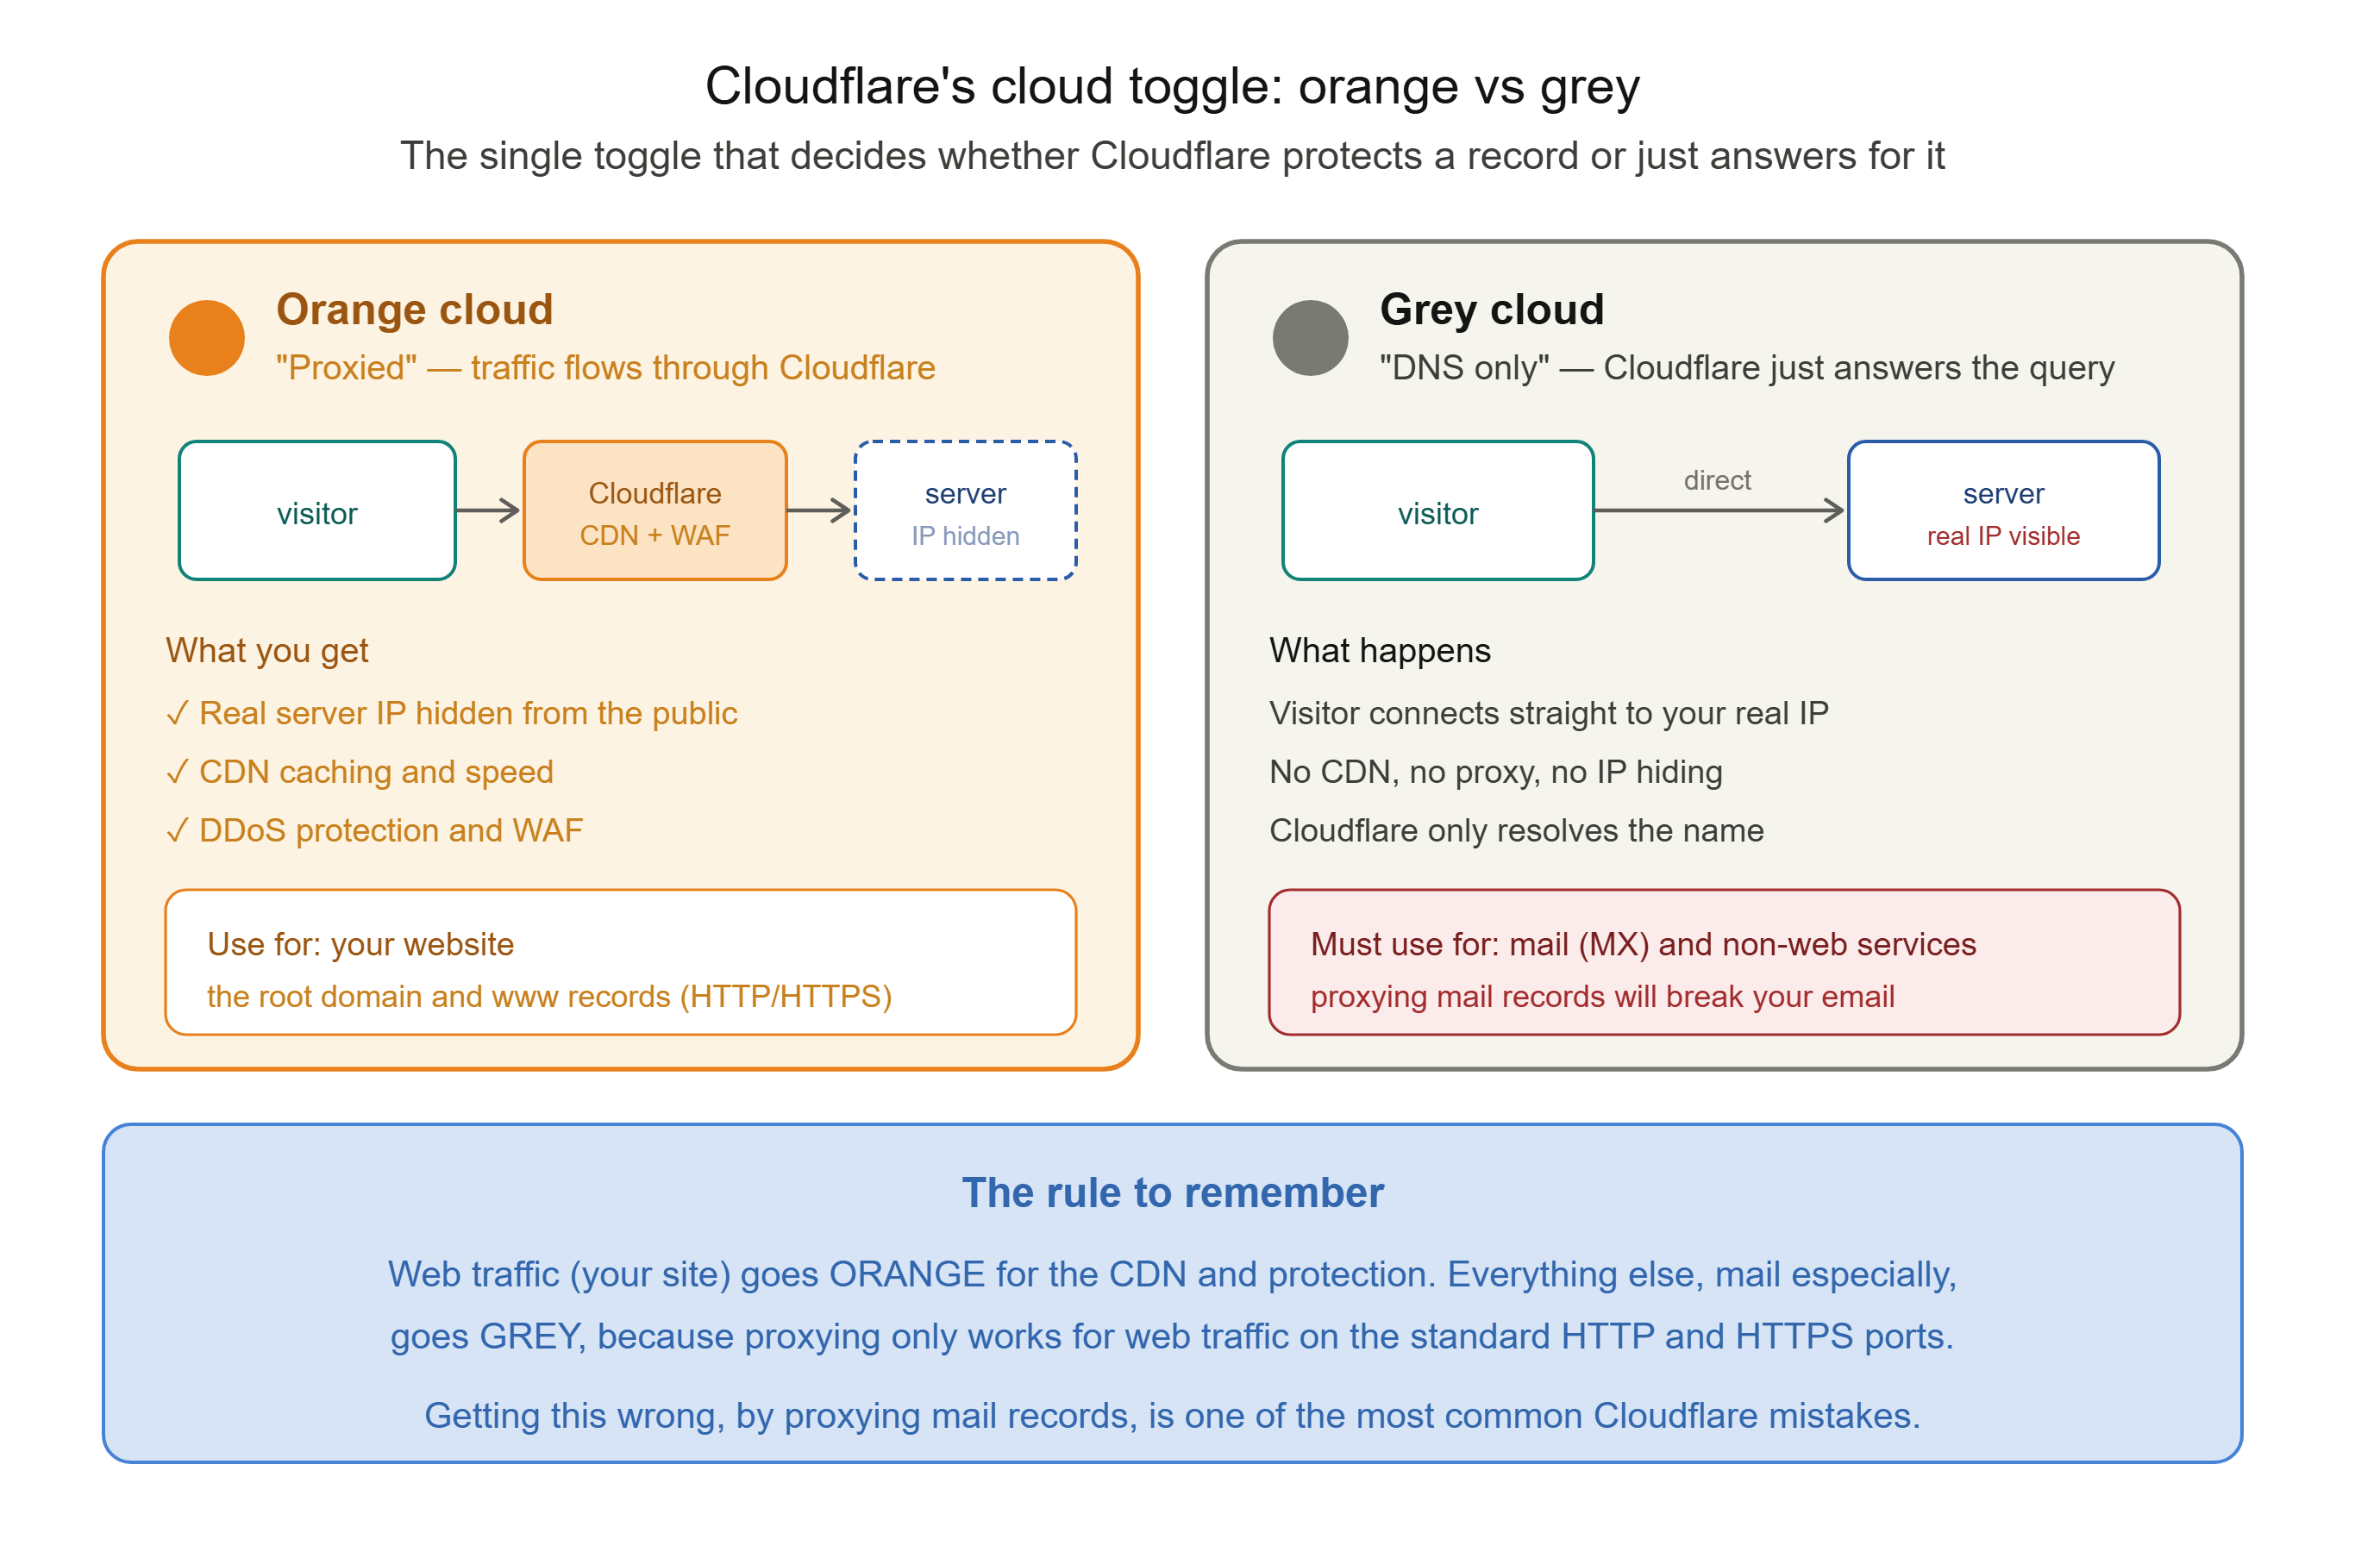
The orange cloud versus the grey cloud. Once you are managing records in Cloudflare, each record has a proxy toggle shown as a cloud icon, and understanding it prevents a lot of confusion. An orange cloud (proxied) means traffic goes through Cloudflare's network first: your real server IP is hidden, and you get the CDN, caching, and protection. A grey cloud (DNS only) means Cloudflare just answers the DNS question and the visitor connects straight to your server's real IP, with none of the proxying. For a normal website you want the orange cloud. But one rule to remember: mail records, and any non-web service like SSH, should always be grey cloud, because proxying only works properly for web traffic on the standard HTTP and HTTPS ports. Proxying your mail records will break your email.
When to choose this method: if you want a CDN, DDoS protection, to hide your origin IP, or if your VPS has a changing IP that you would rather manage through an API than by hand, this is the stronger choice. It is a few more steps up front for considerably more capability afterwards.
Which Method Should You Actually Use?
To make the choice concrete rather than abstract:
Choose the registrar A record method if you have a single VPS with a static IP, you want the simplest possible setup, and you do not need a CDN or the extra protection. It is direct and there is nothing wrong with it. Many perfectly good production sites run exactly this way.
Choose the Cloudflare nameserver method if you want performance and protection features, you want to hide your server's real IP from the public, you are running anything that might attract attention or attack, or you simply want a more powerful DNS control panel and API for the future. Given that Cloudflare's basic tier is free, many developers pick this route by default now, even for small projects, because it costs nothing and leaves room to grow.
Neither is wrong. They are answers to the same question at different levels of ambition.
The Step People Forget: Pointing Is Not Serving
Here is a mistake so common it deserves its own section, because it causes hours of confused debugging.
Getting your domain to point at your server is only half the job. It gets a visitor's browser to arrive at your server's front door. But it does nothing to make your server actually answer for that domain once they knock. Those are two separate things, and people constantly do the first and forget the second.
"DNS points to the server" and "the server is configured to serve the site for that domain" are different steps. Your DNS records send the visitor to the right IP. But your web server software on the VPS, whether that is Nginx, Apache, Caddy, or something else, also has to be told to respond to requests for your domain name and serve the right content. If you point your domain correctly but never configure the web server to recognise it, you will get a connection that lands but shows a default page, an error, or nothing useful, and you will wrongly assume the DNS is broken when it is fine.
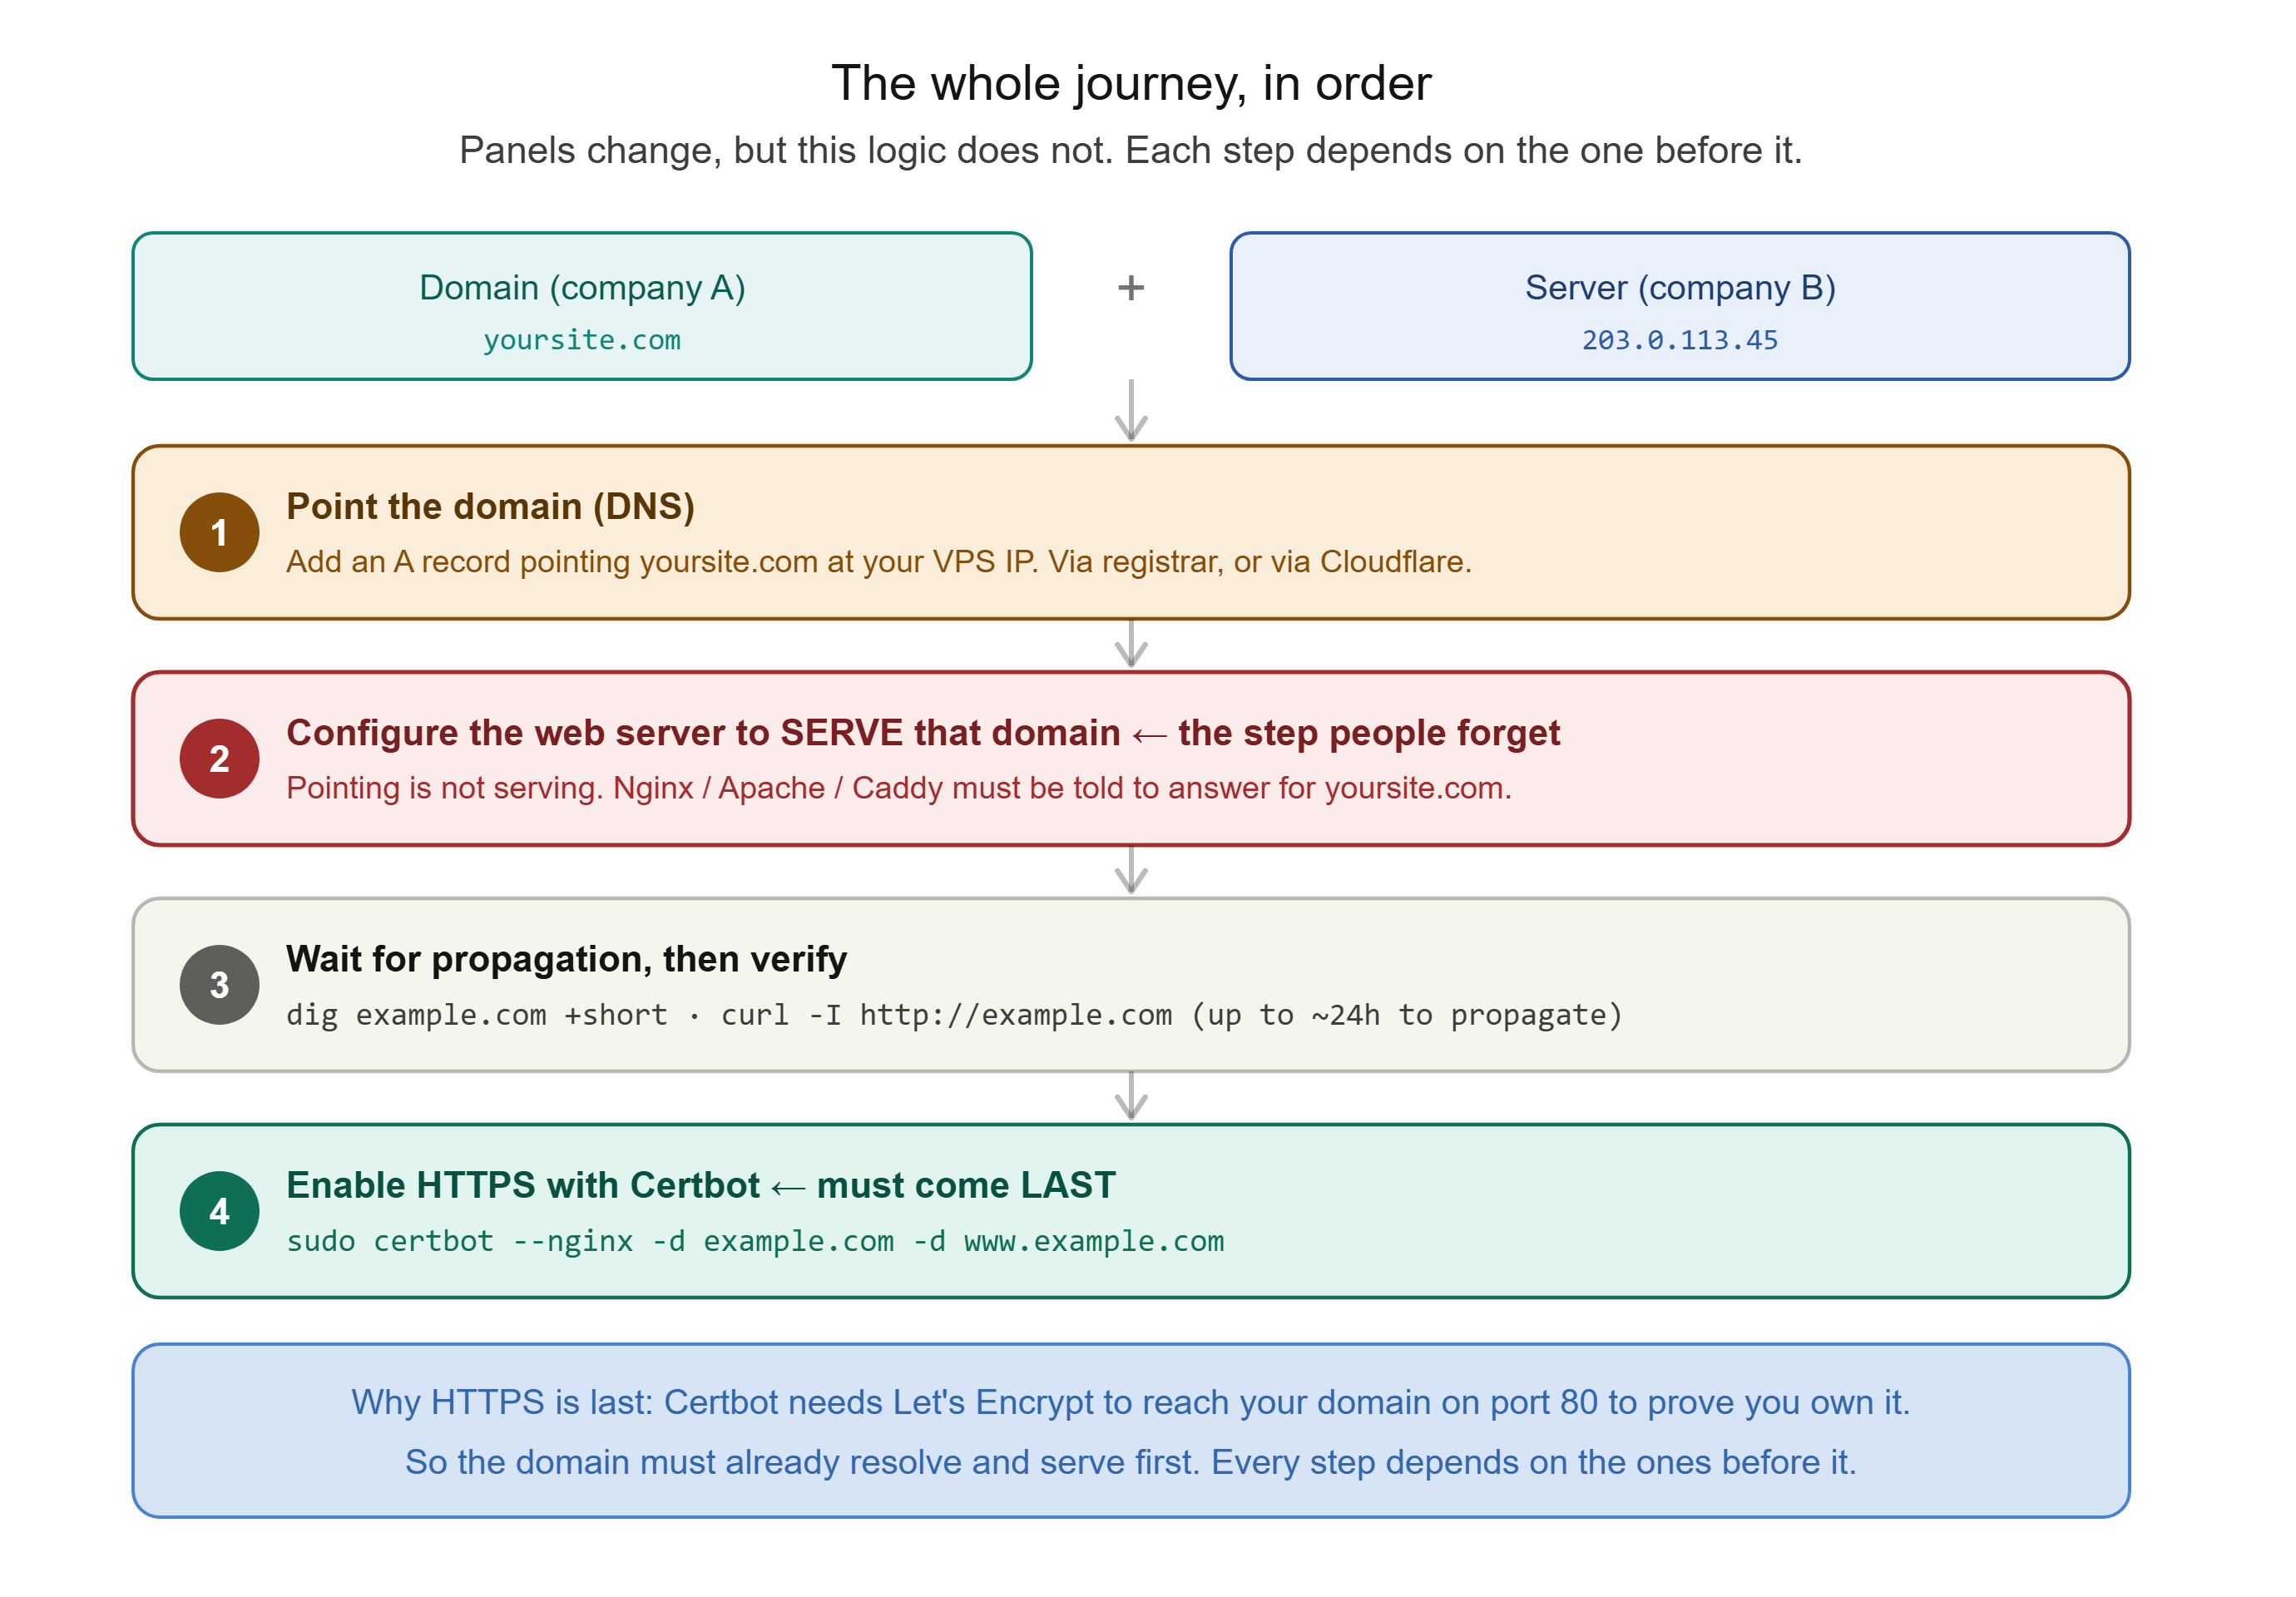
So the real sequence is: point the domain (DNS), and configure the web server to serve that domain (server config). Only when both are done does typing your domain into a browser actually show your site.
Verifying It Worked, and the Waiting Game
Once you have set your records, you will want to check whether they have taken effect, especially since propagation is not instant. Two commands do almost all the work, both of which the DNS post introduced.
Check what your domain currently resolves to:
dig example.com +short
This should eventually print your VPS's IP address. If it prints nothing, or an old address, propagation has not finished, or a record is wrong. Run it again after a while.
Check that your server actually responds over the domain:
curl -I http://example.com
This makes a request and shows you the response headers. A sensible response here means your domain is not only pointing at the server, but the server is answering for it, both halves of the job done.
If these do not work immediately, resist the urge to change everything in a panic. Propagation genuinely can take up to 24 hours, occasionally a little more, because DNS resolvers around the world are still serving cached older records until their TTL expires. A tool like whatsmydns.net lets you watch propagation happen across different locations globally, which is reassuring when you are wondering whether you broke something or simply need to wait.
The Final Step: Turn On HTTPS
Your domain points at your server, and your server answers for it. But right now it does so over plain, unencrypted HTTP. In 2026, browsers show a visible "Not Secure" warning on HTTP sites, which quietly scares away visitors and undermines trust. And as the DNS and firewall posts in the series argued, unencrypted traffic is a genuine security exposure, not a cosmetic issue. So the last step of any real deployment is enabling HTTPS.
The standard, free way to do this is Let's Encrypt, a free and automated certificate authority, using a tool called Certbot. On a typical Ubuntu server running Nginx, the process is short.
Install Certbot and its Nginx plugin:
sudo apt update
sudo apt install certbot python3-certbot-nginx -y
Then request and install a certificate for your domain:
sudo certbot --nginx -d example.com -d www.example.com
Certbot verifies that you control the domain, obtains a certificate, and automatically edits your Nginx configuration to serve HTTPS. It will offer to redirect all HTTP traffic to HTTPS, which you should accept. The certificate is valid for 90 days and renews itself automatically, so this is genuinely a set-and-forget step.
The crucial ordering gotcha, and why this section comes last. Certbot's standard verification method works by having Let's Encrypt connect to your domain over the public internet, on port 80, to confirm you really control it. This means your domain must already be resolving to your server and reachable before you run Certbot. If DNS has not propagated yet, or your server is not answering on port 80, certificate issuance will fail. This is exactly why HTTPS is the last step: it depends on every previous step already being complete and live. Get the domain pointing and serving first, confirm it with the commands above, and only then run Certbot.
Once done, verify:
curl -I https://example.com
Seeing a secure response here is the finish line. Your domain, bought from one company, now points at your server, bought from another, and serves your site securely over HTTPS. The gap is closed.
The Whole Thing, in Order
Stepping back, here is the complete mental model, which is worth more than any single set of click-by-click steps because panels change but the logic does not:
You have a server with an IP, and a domain with a name, bought from two unrelated companies. To connect them, you first decide who hosts your DNS: your registrar, the simplest option, or a third party like Cloudflare, the more powerful one. Then, wherever that DNS lives, you set an A record pointing your domain at your VPS's IP. You separately configure your web server to actually answer for that domain, because pointing is not serving. You wait for propagation, verify with dig and curl, and finally enable HTTPS with Certbot once the domain is live and reachable.
Every developer hits this gap once. The reason it feels so confusing the first time is that no single company owns the whole journey, your VPS provider, your registrar, and your DNS host are potentially three different parties, and none of them explains the parts owned by the others. But once you hold the concept, that this is two decisions and a couple of verification steps rather than one mysterious action, it stops being intimidating and becomes something you can do confidently in a few minutes, for any domain and any server, for the rest of your career.
This was a standalone practical guide. If you want the theory underneath it, why a name resolves to an address at all, how the lookup actually travels the internet, and why propagation works the way it does, it is covered in Post 5 of my Networking Foundations series, on DNS. And if this saved you the confusion it saves most people, share it with someone about to deploy their first server. Subscribe to my newsletter for more practical, foundations-first guides like this one.
Comments